
Jonathan Ochshorn
© 2005 Jonathan Ochshorn. A version of this essay was originally presented on two panels for a faculty show with the theme, "cause and effect," Hartell Gallery, Cornell University, Feb. 2005.


Architect Designs and Builds Home Addition
Process Explained in Terms of Cause, Effect
By JONATHAN OCHSHORN
ITHACA, NY, 2004–05 — Design is a process in which cause and effect are mediated by analysis. The process is linear (since we live and act in real time) but iterative, so that "effect" often becomes a new "cause."
Design is also a process influenced by both abstract ideas (about form) and practical ideas (about reality, including issues of cost, construction, structure, energy, etc.). Abstract ideas about design are often in conflict with ideas about reality. While this tension between appearance (form) and necessity (gravity, thermal behavior, and so on) is what gives architecture its charm, it also makes the design process rather difficult for designers who place inordinate value on the mundane aspects of reality. This is especially true in my case, not only because I have difficulty prioritizing the arbitrary and capricious over the logical and sensible, but because I have decided not only to design, but to engineer and build much of this project myself. Every possible pleasure in manipulating appearance/form is therefore immediately directed to that other part of my brain that asks: "Can I build this?" "Does this make sense?" "How much will it cost?"
In what follows, I have schematized and summarized my design process beginning with a first "cause" and leading to a final "effect:" the design and construction of an addition to my house in Ithaca, NY. For addition[al] details on the actual construction process, check out: design-build addition.
Options and Analysis: We need more space. No doubt about it. We're sleeping on a futon in the living room, there's no place to create artwork, the piano is in conflict with the radio, the television interferes with reading, and there's no place for winter coats and boots. Options include finding a new house, building an addition, renovating the garage, or locating external (additional) space. For over 10 years we study and debate the options; finally we decide that building an addition has the most benefits at least cost.
Effect: Decision to design and build addition.
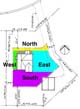
Options and Analysis: Addition can be placed on one of four sides of our lot (east, west, south, or north). West requires purchasing neighbor's property (not possible); north yard is not big enough, plus it destroys existing front facade and sits on existing sewer, gas, and water lines (bad idea); south destroys small back yard and elm tree; east could be placed in or about existing driveway without taking up any yard space and with minimal impact on existing house or utilities; possible link through existing side door; driveway needs to be redone anyway.
Effect: Decision to design addition on east side of house.
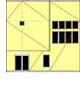
Options and Analysis: Several schemes are developed. Option "A" is a bar perpendicular to the east facade; Option "B" is a bar parallel to the east facade. Option "A" leaves existing bathroom windows, and requires no modification to existing utilities on east side (dryer vent, sanitary sewer vent, water meter, kitchen range exhaust fan) but permanently separates garage from driveway. Option "A" has more surface area (less energy efficient). Option "B" requires modification of existing bathrooms (because windows are removed, both bathrooms need exhaust fans), kitchen range exhaust fan, as well as dryer vent, sanitary sewer vent, and water meter.
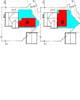
Also requires more attention to intersection with existing roof. Option "B" leaves one half of garage accessible and connected to driveway, and, by sharing a wall, has less surface area (more energy efficient). Option "B" appears more integrated with the existing house.
Effect: Decision to design addition as bar parallel to east facade (Option "B").
Options and Analysis: Two problems present themselves immediately. (1) Existing foundation wall on east side of house appears slightly distressed (bowing outward) under existing loads, and would need to be reinforced if the added weight of new construction is transferred to it; and (2) The existing roof at the east side of the house has a certain coherence (charm) and integrity; it would be best to leave it untouched. I immediately decide to configure the addition as a "free-standing" block, with footings completely independent of the existing house, and an articulated connection to the existing house below the existing roof line. Additional foundation wall "spurs" can be configured to brace and stabilize the bowed concrete block wall.
Effect: Decision to design bar as freestanding block with articulated connection.
Options and Analysis: Because there is limited space between the existing house and the driveway — only a little more than 16 feet — the addition width is constrained. To maximize useful space in the "block," the articulated connection piece must be as narrow as possible.
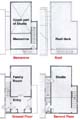
The question as to what goes in the connector, and therefore what its dimensions are, depends on how the block is configured and how access to the various spaces is organized. The basic program needs are already known (see original "cause"): an adequate entry with closet space, additional living space so that competing activities of various family members (computer, piano, TV, stereo, reading, writing, etc.) can take place in acoustically isolated spaces, and a large art studio. The entry will connect the existing side door (to the kitchen) with the driveway; the so-called "family room" will occupy the remaining ground-floor space; and the large studio will be on a second-floor level. That much is immediately clear. Access to the studio can be either from the existing house (through the parents' bedroom on the east side of the house) or via a new stair within the addition. A new stair provides most flexibility, and can be designed so that access to the studio can occur without violating the privacy of other living spaces in the house.
The connecting link between the existing house and the new "block" is ideally situated for such a stair; the new International Building Code [IBC] sets the minimum stair dimension at 3 feet. That leaves about 13'-6" of space available for the main block (12'-6" interior dimension), which can easily be spanned with conventional 2x10 joists.
Effect: Decision to place studio stair in 3-foot wide connecting link.
Options and Analysis: Isolating the studio from the house has numerous benefits, but access to a bathroom from the studio becomes problematic. The 3-foot connecting link can accommodate a small bathroom (with a 3-foot wide shower) directly over the entry without interfering with the new stair. Since the existing parents' bedroom on the east side was formerly a 2nd-floor kitchen (the house was configured as a tiny 2-family house when we bought it in 1990, with a small 1-bedroom apartment on each floor), we have direct access to water supply in the existing wall adjacent to the new bathroom. The existing waste line, however, is too small for an additional shower and toilet, so a new waste (and vent) is needed.
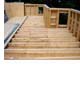
I can run a waste line directly down from the corner of the new bathroom, through a new closet and under a new raised floor at the entry. I check the existing waste line in the basement and determine that the new waste can penetrate into the basement and be connected. So far, so good. The vent for the new bathroom can either be made in the new roof of the connecting link, or can run horizontally through the link's "attic" space, and be connected in the attic of the existing house to the existing cast iron vent line. The latter option has the advantage of requiring no new roof penetrations. The existing house first-floor elevation is about 18" above grade; however, the first floor of the addition must be as low as possible so that the new bathroom in the connecting link can fit under the existing overhanging roof on the east facade. If the new first floor is constructed with wooden joists above a crawl space or basement, it would need to be as high as the existing floor (to allow for basement windows or crawl space vents). An option would be to build the first floor as a slab-on-grade, perhaps 6" above the adjacent grade, requiring no vents or windows below. With this option, the ground floor spaces can be 8-feet high, only reduced to 7-feet in the zone of the connecting link where the floor steps up one foot to meet the existing first-floor elevation. This option has two benefits:
(1) it is not necessary to step down 1 foot and then up again when traveling between the existing house and the new stair to the studio; and (2) the horizontal waste pipe from the new bathroom can be placed under the raised floor in the 3-foot link, facilitating its connection to the existing waste line in the basement. This existing sewer pipe is unusually high — only about a foot below the basement ceiling. It should also be noted that an extension of the existing basement would require substantial excavation — the existing basement is a full 7-feet below grade—directly into the uphill slope where ground water is most likely to be encountered.
Effect: Decision to place bathroom in 3-foot wide link and design slab-on-grade for main block.
Options and Analysis: New York State's Energy Code provides guidance for insulating foundation walls around slabs: to meet the code's criteria, I choose to place 2" rigid insulation around the inside perimeter of the foundation wall. Placing the insulation outside the foundation wall is more efficient thermally, but I prefer to have the hard concrete, rather than the soft insulation, on the outside surface. This presents a problem at two points where the insulation's continuity is interrupted by intersecting interior foundation walls (i.e., where the main block meets the 3-foot wide connecting link).

To address this "thermal bridge," I design and build insulation inserts that can be placed in the formwork before the concrete walls are cast.
Effect: I avoid thermal bridges in the foundation wall while protecting the foundation insulation from potential damage.
Options and Analysis: At this point, the basic configuration of spaces has been determined, and all structural and plumbing issues have been at least schematically analyzed to establish feasibility. The 2nd-floor studio will be a double-height space, raising the possibility of inserting a mezzanine within. Since it is possible, and relatively easy and cheap to build, the mezzanine idea becomes incorporated into the design brief.
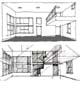
By code, a mezzanine can occupy up to 1/3 the area of the studio space, and does not count as a 3rd floor. This is important because building a 3rd floor triggers additional code requirements, including fire sprinkling. The mezzanine could be a long, thin "balcony" parallel to the long dimension of the space, or a more square configuration at either the north or south side of the studio. A square shape is more flexible for alternative uses, while a long narrow mezzanine would constrict the already narrow studio volume. We decide on a square shape. Because we value north light for the main studio space, we place the mezzanine at the back (south). The question of access to the mezzanine is vexing. A straight-run or switchback stair takes up too much space. A spiral stair looks cool and, inexplicably, can be quite small per IBC regulations.
But small spiral stairs are hard to navigate, especially when carrying art supplies. This question remains unresolved as the formal implications and opportunities of the scheme begin to be examined.
Effect: Decision to place mezzanine in double-height studio space.
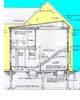
Options and Analysis: The basic organization of spaces can be articulated within any one of several stylistic genres. I am inclined by temperament, and by limited financial resources, to work within a genre that minimizes gratuitous formal elements, i.e., makes architecture only out of what is otherwise necessary. Two schemes are developed, one with a traditional pitched roof similar in form to the existing house, and one in an early-20th-century-modernist vocabulary, complete with flat roof (accessible roof deck), and proportions governed by the golden ratio.
The traditional design is easier and cheaper to build, but it doesn't have a roof deck. The roof deck wins. It can be accessed from the mezzanine level by an exterior stair at the back (south). I check out Corb's Ozenfant House and Studio and confirm that his big corner windows are oriented, like mine, to the east and north.
Effect: Decision to use a modernist vocabulary adds a roof deck to the project brief.
Options and Analysis: To gain access to the roof deck, an exterior spiral stair from the mezzanine level seems easiest (and smallest), but internal family squabbling puts such a stair on hold. In fact, the unresolved problem of vertical circulation places the entire project in doubt. A revised scheme is necessary. I examine the site plan again, and notice that the angle of the driveway with respect to the addition's east wall leaves some available space on the east side of the addition.
If I cantilever off the first-floor wall on the east side, I can construct a straight-run stair that connects the studio to the mezzanine without taking any space from the studio. Simultaneously, I will have created an overhanging soffit to protect the side entrance while also creating new storage space for the studio, under the new stair. Most importantly, I avoid using the dreaded spiral stair.
At the same time, the extra three feet of space now available on the back (south) facade allows me to design a straight run stair from the mezzanine to the roof deck. The proposed cantilevered stair zone solves both spiral stair controversies, while creating a better side entry condition and additional storage space.
Effect: Decision to create a new 3-foot wide stair zone on the east facade.
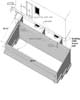
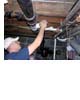
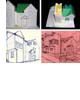
Options and Analysis: The "flat" roof and roof deck create certain structural and constructional difficulties. (1) Insulation and ventilation: A traditional pitched roof can be easily insulated and ventilated to prevent ice dams, conserve energy, and protect the roof itself from excessive heat gain. A "flat" (actually low-slope) roof is more difficult to ventilate properly, since the natural convection of air beneath the roof surface requires a minimum of about three feet vertical separation between the entry point of fresh air (e.g., at a soffit vent) and the exit point (e.g., at a ridge vent or attic vent). In order to accomplish such convection, I develop a pathway for air to circulate below the roof membrane, entering at a continuous soffit vent below the gutter, continuing within sloped rafter spaces built above insulated joist space, and exiting through a plenum built into the parapet wall connected to three large rectangular attic vents. (2) Structure: The new stair from mezzanine to roof deck is cantilevered off the addition's 2x6 wall framing, placing significant stress on the conventional wood-framed structure. In order to resist these forces at the top connection (at the parapet wall), I design (in the "engineering" sense) the west parapet wall as a shear wall consisting of plywood sheathing panels nailed to studs.
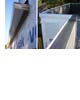
Air enters through soffit vents (left) and exits through "attic" vents connecting to plenum within parapet wall (right). [enlarge]
Because the continuity of this necessary parapet/shear wall is in conflict with the requirement to have a continuous roof gutter (and soffit vent), a compromise is worked out. I extend the parapet wall sans gutter for 4 feet from the stair connection at the south-west corner of the addition, sufficient length to develop adequate shear resistance in the wall panel, and design the roof with a 4-foot "cricket" at this corner to divert water to the smaller gutter. Because there are no soffit vents at this corner, I cut notches into the sloped joists providing ventilation in this zone of the roof. In addition, I design a special beam-column at this corner consisting of two vertical 2x6 members (flanges) connected to two 2x3 members (web). The result is a 5-1/2" square post consistent with the corner windows framed immediately below the parapet.
Effect: Decision to ventilate roof using soffit and attic vents consistent with structural requirements of external stair.
Options and Analysis: Once the roof design is in place, the facade design, until now treated quite abstractly, must be developed. Two primary issues are at stake: siding material and windows. Cost, ease of installation (I'm doing it myself), and long-term maintenance are the main criteria. (I.) Siding. Vinyl siding is almost OK, but I never liked the sloppiness with which the vinyl siding meets doors and windows. T-111 plywood siding is another option, but wood of all sorts is getting rather expensive. I'm also not convinced that it's long-term maintenance is that good, especially if I do a bad job painting it. We ask around at area lumber yards for alternative, cheap siding products, and discover Hardipanel, a fiber-cement board slightly more than 1/4" thick. We do our normal, extensive internet research, and try to find some local examples. Lots of Hardiplank is being used as an imitation wood siding, but the unadorned 4' x 8' panels are not that common, except in fake board and batten applications. I like the basic specifications of the 4' x 8' panels — they take paint better than wood, they provide shear resistance like plywood, they can be nailed in place, and they're cheap.
For me, there are three major problems with Hardipanels: (1) They are a bit dangerous to cut, releasing silica dust into the air. I research this problem, and decide to purchase a new circular saw with a diamond blade and built-in dust collector to reduce airborne silica dust. I'll also do all cutting outside. (2) I have no idea whether the panels will be able to accommodate inevitable dimensional inaccuracies in the facade. I know that I can finesse such problems with wood or plywood siding, but I'm not sure how the stiffer cement-board panels will react to constructional imperfections. In the end, I decide to just take a chance. (3) My abstract facade design does not account for horizontal or vertical joints, but waterproof joints are part of reality (which always wins over abstract ideas). I need to figure out how to create a waterproof surface using these panels. Plywood T-111 panels have overlapping vertical joints and rely on metal z-bar flashing at the horizontal joints. Hardipanel's website suggests flashing at the horizontal joints, but is vague about requirements for the vertical joints, recommending the use of battens (as I said, fake board and batten seems to be the main application of the product). In the end, I research the use of sealant for the vertical joints, deciding on a widely available, but pricey, "extreme paintable silicone II sealant" (XST, manufactured by GE) and find a vinyl z-bar flashing product for the horizontal joints made specifically for the unusually thin dimension of Hardipanels. This solution minimizes the appearance of vertical joints and accentuates the horizontal, much like FLW's manipulation of mortar joints at the Robie House.
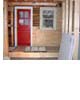
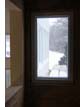
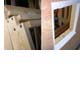
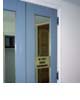
By strategically cutting the Hardipanels, flashed horizontal joints can be aligned with window heads, not only facilitating construction and waterproofing, but reinforcing the proportional divisions based on the golden ratio that are implicit in the abstract design. (II.) Windows. The search for the perfect, cheap, window takes us on journeys all around the Fingerlakes region. There are several cheap versions of wood or fiberglass windows (Pella, Marvin, Andersen), but their casements seem poorly designed and constructed. In contrast, some of the vinyl windows we examine are not only cheaper and more energy-efficient, but seem stronger and more thoughtfully detailed. We examine countless vinyl windows, finally choosing Farley, a Canadian company distributed by one of the local "home" stores. Good price; good hardware; good thermal performance. I detail the windows as "replacement" rather than "new construction" for several reasons: (1) Replacement windows are routinely manufactured to the exact size one wants, rather than in 4" increments. (2) Replacement windows can be installed from the inside, so I won't need to be carrying them up and installing them from scaffolding. (3) Replacement windows can be easily removed and replaced if they prove unsatisfactory, while new construction windows are essentially built in to the outside siding or exterior trim. (4) Replacement windows can be set recessed into the exterior wall, affording some protection from rain, while typical new construction windows are installed on the outside sheathing, so that the plane of glass is beyond the outside surface of the wall. Aside from affording more protection against rain, the recessed replacement windows make the abstract idea of the facade design more evident, providing a stronger contrast to the plane of the siding. Of course, I'll need to build 26 window frames if I use replacement windows, but I can do this at low cost, using #2 pine and clever detailing.
Effect: Decision to use fiber-cement siding and vinyl replacement windows.
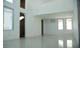
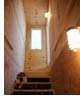
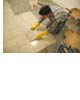
Options and Analysis: The exterior design having been finalized, it is now possible to deal with interior finishes. Gypsum board is used for walls and ceilings in the main addition "block." I decide to leave 1/2" CDX plywood sheathing exposed in the 3-foot wide stair zones, since it's there anyway, and the requirement for a neutral light-reflecting surface doesn't apply in these circulation spaces. Of course, I'm also influenced by the use of this material as an ironic and iconic commentary on good taste by F. Gehry in several of his public buildings in LA (his Loyola Law School and Disney Concert Hall come to mind). We decide to leave the ground floor slab-on-grade as is, and do an extensive search for an appropriate concrete sealer. Since we are installing the sealer ourselves in the middle of winter, with no possibility of opening windows for ventilation, we discover a zero-VOC sodium silicate-based compound with no odor that hardens and seals concrete while leaving its surface looking pretty much as is.
We also examine alternative sealers, paints, and epoxies, some of which are incredibly cool looking, much like 1950s linoleum. But the application process is too complex, requiring cleaning and etching the concrete surface, and these products contain VOCs. Professional application is expensive, up to $8 per square foot (i.e., around $3000 for the ground floor slab). In contrast, a 5-gallon pail of Eucosil, manufactured by the Euclid Chemical Company, costs only $56, including shipping from a distributor in New Jersey (no one in Ithaca carries the stuff). The studio and mezzanine floors are finished with tile, after another round of research trips throughout the Fingerlakes. Pre-finished bamboo floors seem to be the cheapest wood alternative (about $3 per square foot), but we decide to buy 600 square feet of polished Italian porcelain tile that we discover, by chance, at a close-out sale in Syracuse.
The cost is about the same as the cheapest pre-finished bamboo ($1.50 per square foot for the tile itself, plus another $1.50 for cement-board underlayment, thin-set mortar, and grout).
Effect: Decision to use a concrete sealer on the ground floor and porcelain tile everywhere else.
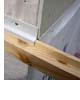
Options and Analysis: Trim is required along the bottom edges of walls (baseboard) and around door frames (casing). The baseboard protects the walls from damage, especially when floors are being cleaned, and covers the space left at the perimeter of finish floor surfaces.
It must be wide enough at the bottom to reach the finish floor, but can be narrow at the top to minimize horizontal surfaces on which dust collects. The narrow top, sometimes literally separated from the actual baseboard as a "base molding," also makes it easier for the board to be nailed flush with any deviant wall surface, since its narrow profile is more flexible. Traditional baseboard profiles satisfy these criteria while also appearing to be gratuitously decorative (which they are not). Modern baseboards (e.g., flat unarticulated boards) do not satisfy these criteria, while looking quite functional. Traditional baseboards also do two other things that I like: (1) they make the walls appear to be carved out of something thick and monolithic; and (2) they provide a frame so that the floors — even our unadorned concrete slab — appear as works of art (per M. Duchamp). What's more, the stuff is cheap: we get the pre-primed medium density fiberboard (MDF) 5-1/4" x 5/8" colonial style baseboard for $0.85 per foot.
Effect: Traditional baseboard and casing is selected: the design process is complete.

Created Feb. 2005. HTML version first posted 6 May 2008. Last updated: 9 May 2008
![[enlarge]](p07.jpg)
![[enlarge]](p08.jpg)
![[enlarge]](p09.jpg)
![[enlarge]](p10.jpg)
![[enlarge]](p11.jpg)
![[enlarge]](p12.jpg)
![[enlarge]](p13.jpg)
![[enlarge]](p14.jpg)
![[enlarge]](p15.jpg)
![[enlarge]](p16.jpg)
![[enlarge]](p17.jpg)
![[enlarge]](p18.jpg)
![[enlarge]](p19.jpg)
![[enlarge]](p20.jpg)
![[enlarge]](p21.jpg)
![[enlarge]](p22.jpg)
![[enlarge]](p23.jpg)
![[enlarge]](p24.jpg)
![[enlarge]](p25.jpg)
![[enlarge]](p26.jpg)